
Zakka 2.0 - Patchwork Pincushion and the Paper Piecing Lowdown
I told y'all about the book sew along that I'm doing called Zakka 2.0. Well, if you missed that you can read about it here. Anyways, on the cover of the book there are some adorable pin cushions and I could NOT wait to make one, or two, or three...
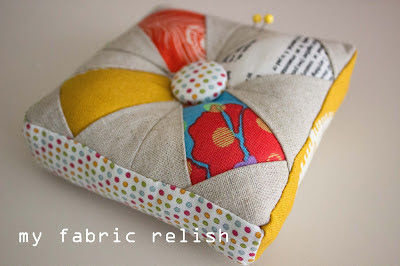
See, isn't it adorable? And it was totally fun to do! I've been itching to get back to making a few more and even maybe have a giveaway later. This was my first time paper piecing, and I don't know what the heck I was waiting for. Granted this was a very simple paper piecing project, it still opened a whole new world of quilting and piecing for me.
Anyway, I thought I would show you how I did the paper piecing part in case anyone else is a little timid to try or plans on doing this project in the book.
1. Supplies: paper, small acrylic ruler, rotary cutter, fabric glue stick, iron, and a really dirty pressing board (mandatory...haha).

2. Place wrong sides together and make sure the center piece covers what it needs to cover. *I failed at this part but fixed it later, you'll see.* I used a little fabric glue to keep the fabric in place. I like to put it up to a light or window to see.

3. Place your second piece on top right sides together. Then look under a light source to make sure it has at least a 1/4 inch seam allowance and goes to the end of the square. *I realized here my red center fabric was not covering the entire center square and repositioned it. I know you were worried since the last picture. Nothing to fret anymore. Whew!*


5. Press to set seam, then peal back the paper and leave the fabric as is (see picture). Trim off at 1/4 inch. Lay the fabric and paper flat again and then press back the seam.


6. Repeat for the three other sides going either counter or clockwise.

7. Trim up the edges. Keep 1/4 inch seam allowance per instructions in book.


TaDa! Isn't that a pretty looking back? Now make three more!


And if you haven't made covered buttons before, then get to it! It's so simple and cheap and addicting! Seriously, the hardest part was stopping! I got my kit at JoAnn's for less than $5 or you can get one at Amazon here.

Here is the youtube video I used to learn a little about paper piecing and recommend it for newbies like me.... The Paper Gemini Paper Piecing Tutorial!
Also, want to try out a kaleidoscope paper piecing quilt that's fairly simple like above? Check out Rita's over at Red Pepper Quilts! She has a printable template for FREE, too!
Thanks for stopping by!
Melissa
I love comments! They totally make my day. For real!

See, isn't it adorable? And it was totally fun to do! I've been itching to get back to making a few more and even maybe have a giveaway later. This was my first time paper piecing, and I don't know what the heck I was waiting for. Granted this was a very simple paper piecing project, it still opened a whole new world of quilting and piecing for me.
Anyway, I thought I would show you how I did the paper piecing part in case anyone else is a little timid to try or plans on doing this project in the book.
1. Supplies: paper, small acrylic ruler, rotary cutter, fabric glue stick, iron, and a really dirty pressing board (mandatory...haha).

2. Place wrong sides together and make sure the center piece covers what it needs to cover. *I failed at this part but fixed it later, you'll see.* I used a little fabric glue to keep the fabric in place. I like to put it up to a light or window to see.

3. Place your second piece on top right sides together. Then look under a light source to make sure it has at least a 1/4 inch seam allowance and goes to the end of the square. *I realized here my red center fabric was not covering the entire center square and repositioned it. I know you were worried since the last picture. Nothing to fret anymore. Whew!*


-- even the monkeys see my error...dang them!--
4. Take to machine and sew a little more than 1/4 inch from where the actual seam starts. Use a 1.0 stich length so the paper tears away easily.

4. Take to machine and sew a little more than 1/4 inch from where the actual seam starts. Use a 1.0 stich length so the paper tears away easily.

5. Press to set seam, then peal back the paper and leave the fabric as is (see picture). Trim off at 1/4 inch. Lay the fabric and paper flat again and then press back the seam.


6. Repeat for the three other sides going either counter or clockwise.

7. Trim up the edges. Keep 1/4 inch seam allowance per instructions in book.

TaDa! Isn't that a pretty looking back? Now make three more!


And if you haven't made covered buttons before, then get to it! It's so simple and cheap and addicting! Seriously, the hardest part was stopping! I got my kit at JoAnn's for less than $5 or you can get one at Amazon here.

Here is the youtube video I used to learn a little about paper piecing and recommend it for newbies like me.... The Paper Gemini Paper Piecing Tutorial!
Also, want to try out a kaleidoscope paper piecing quilt that's fairly simple like above? Check out Rita's over at Red Pepper Quilts! She has a printable template for FREE, too!
Thanks for stopping by!
Melissa
I love comments! They totally make my day. For real!


I absolutely LOVE paper piecing! There's no "real" measuring, and you can use up lots of little scraps and the end result is amazing! I have a WIP of this Harry Potter paper piecing quilt...I think it's amazing: http://hp_paperpiecing.livejournal.com/
ReplyDeleteBeautiful pincushions! I've never tried a covered button before, they're lovely looking though. :)
I die! that harry potter quilt is amazing! cant wait to see it finished!
DeleteI just adore this pincushion! The covered button makes it perfect. Thanks for that link, too, for the Kaleidoscope block. It will come in handy sometime soon!
ReplyDeleteThanks, Amy and you're very welcome! Nice meeting you too! :)
DeleteI love this pincushion and can't wait to make mine with some Munki Munki prints. I ordered the book from the library and there's a wait list :)
ReplyDeleteOoooooh, Munki Munki!! I'm jealous! Too bad you have to wait but yay for having a cool library that carries such a fun book! The sewing books from my library are ancient. Lol
DeleteThat pin cushion is sooo adorable! However, I am still scared of paper piecing!
ReplyDeleteThis one was super easy and not scary at all! Thanks for your sweet comment!
DeleteWhat a fun pin cushion! I've been wanting to try one, and now I think I will!
ReplyDeleteI hope you give one a try! Thanks for stopping by and leaving a comment :)
DeleteYour pincushion is adorable. Visiting from LGA Monday
ReplyDeleteThank you and thanks for stopping by!!
DeleteOooh! Very nice!
ReplyDeleteCarol
Thanks, Carol!!
DeleteThis looks adorable. Thank you so much for linking up! Hope to see more from you.
ReplyDeleteReally cute! I love the button too!
ReplyDeleteYour pincushion is absolutely delightful!! The covered button is a perfect finish!
ReplyDeleteYou are one prolific sewer! Great demo on the process. That would have been so helpful before I tried it. I muddled through somehow. :) Very cute fabric choices.
ReplyDeletefor those of us who cannot control anger, i think that anger management should be a reuirement to have a quality life,. https://royalcbd.com/product/cbd-oil-250mg/
ReplyDelete