
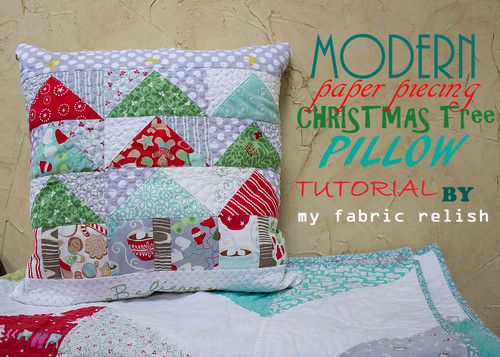
Modern Christmas Tree Pillow Tutorial
It was such a pleasure getting to participate with Heather and Megan's Holiday Tutorial Series over at Quilt Story yesterday and now I can share it will all of you today! Oh and there is a free paper piecing pattern included! Be sure to check out all the other tutorials in the next few weeks -- see the schedule below. I am so happy with the way it turned out and hope to you get a chance to make one or just simply use the paper piecing pattern to make something else. I think these little trees would be cute on place mats, table runners, or even a stocking. Let me know if you give it a try.
Lets get started!
1. Gather Supplies:
- Charm Pack - I used In from the Cold by Kate Spain for Moda
- 1 yard of white/grey/low volume (or you can mix and match)
You will need to cut 2 - 13 1/2 x 18 1/2 inch strips; 9 - 5x5 inch squares; and 1 - 13 1/2 in. square.
- scrap fabrics for wood trunk
- embroidery thread for embellishing
- 21 x 21 inch white muslin (backing for inside of pillow)
- 20 x 20 inch batting
- 1 button
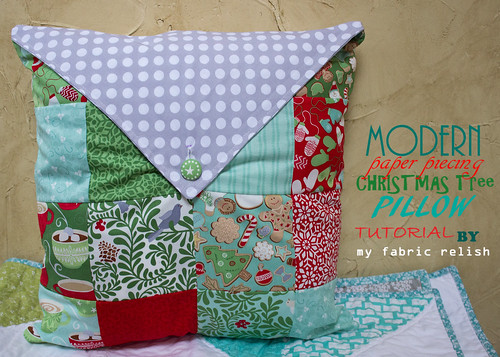
And LOOK! It's reversible!
2. Print 3 copies of the tree template, which equals two pages per tree and six pages all together.
Christmas Tree Template 1 of 2
Christmas Tree Template 2 of 2
3. Tape the pattern together along the red line. Make sure your 1 inch test square is in fact 1 inch.

4. Choosing and cutting fabrics.
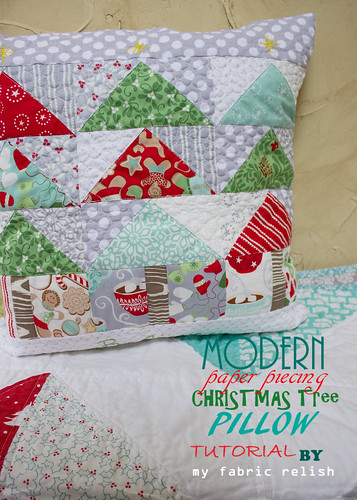
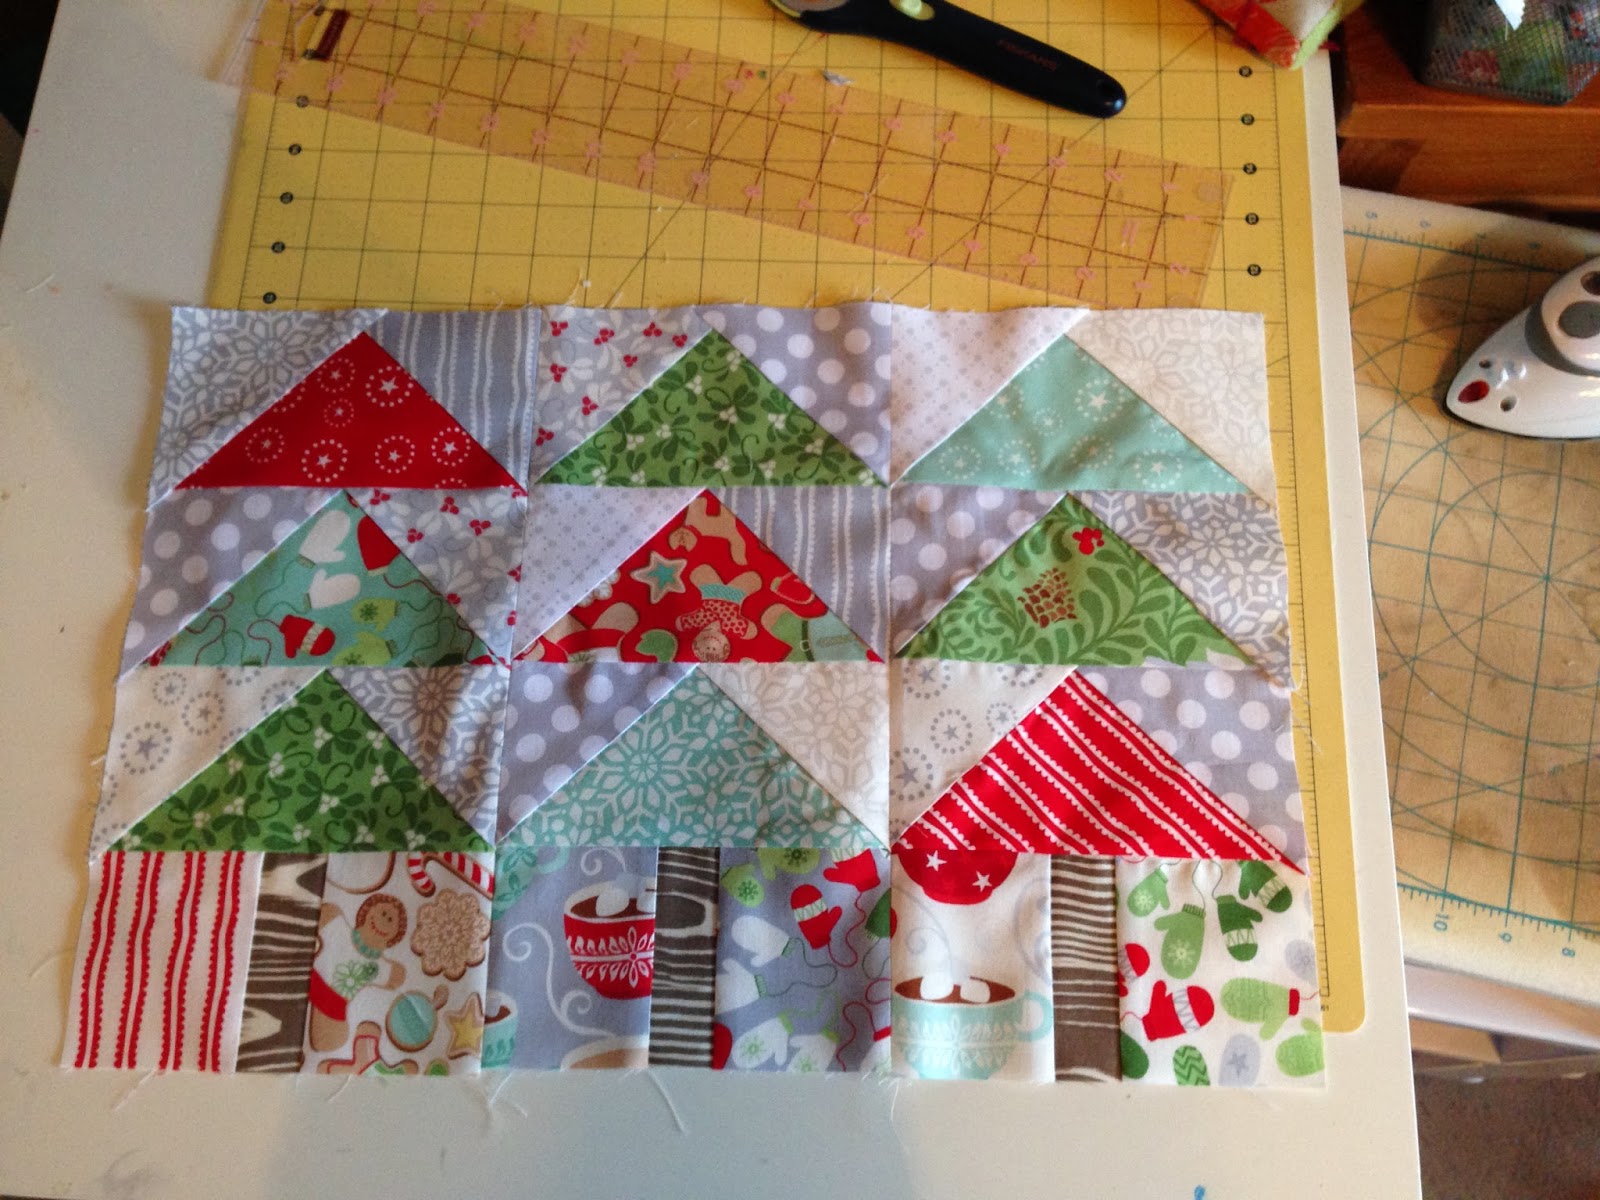
- Choose 5-6 of the charm squares and cut in half on the diagonal. These will be your trees.
- For the tree surrounding you will need 9, 5 inch squares. You can pick some low volume from your charm pack or from your yardage. I wanted these to look like falling snow. You will also cut each of these on the diagonal. Now you have a total of 18, 1/2 squares.
- Choose 6 charms from your pack for under the tree. I picked ones that I thought represented things you find under a Christmas tree. :)

5. Now it's time to piece! Yay! If you are new to foundation paper piecing (FPP), there are many tutorials on the web and videos on YouTube. If you are looking for a bit of guidance, check out my blog post here.
IMPORTANT TIP: Since the fabric triangles for the trees are exactly the right size needed, make sure you line up your fabrics along the line no more that 1/4 inch.


6. Now it's time to trim your blocks. Be sure to add a 1/4 seam allowance to each of the blocks (not included in the pattern). See picture below...


7. Once you have made all three, remove the paper, piece together and press seams open.

8. Add your 3 1/2 x 18 1/2 inch borders to the top and bottom and press.
9. Now it's time to make your quilt sandwich. When making pillows, I prefer to using muslin for the backing since no one will see it and it's much cheaper. You can now quilt as you wish. I went for wavy lines on the top and bottom borders to look like snow and then pebbles in between the trees to look like snow falling. I stitched in the ditch around the trees and trunk.
10. Embellish! Once you are happy with the quilting, you can embellish with some hand embroidery or even add beads to the tree to look like lights. I added stars above each of the trees and then "Believe" at the bottom (kind of hard to see when the pillow is sitting up...oh well). I used my disappearing ink marker, but just be sure to test it on your fabric first (which I NEVER do...shame on me!) and spell check your word, too. Oops! Don't worry, I fixed it! haha This will be a good time to trim down your top to 18 x 18 inches. You shouldn't need to trim the sides, just the top and bottom. You need to keep a 1/4 inch on the sides of the trees so you don't loose your points.


11. Making the back: Now set the top aside and it's time to start on the back. Take 16 of the remaining charms and make a 4x4 block. Make a 1/4 hem at the top of the block. If you would rather quilt this portion, you can add binding to just the top and omit the hemming part. I probably should have quilted this part as well, but I was a tad bit short on time.


12. Time to make the envelope lip! Take a 13 1/2 inch square piece of fabric and slice in 1/2 on the diagonal. Put right sides together and sew a 1/4 inch seam along the short, 90 degree sides of the triangle or the "L". Trim the corner, turn inside out, press, and topstitch the "L".


13. Now it's time to make the pillow sandwich! Lay front (trees) of pillow right side up, then envelope lip on the top with the tip pointed towards the bottom (pin a few times here so it doesn't shift), then lastly the back 4x4 block right side down with hem at the top. Pin the heck out of this layer and even use some Clover Wonder Clips if you have them.


14. Sew the pillow together: Sew a 1/4 inch seam around the pillow using a small stitch length (about 2.0) being sure you only catch the front and envelope layer on the top. Hope that makes sense? In other words, you do NOT sew the hemmed end of the back to the envelope and front OR you will stitch the whole thing together!

15. Getting close! Trim the corners on the inside and finish the exposed edges with either a serger or zigzag stitch. Or you can just leave it be. Totally up to you! Turn inside out and start getting excited!
16. Almost done! Time to add your button hole to the back of the pillow at the bottom of the envelope lip. I just took the fabric covered button I made and marked my button hole line and then let my machine work it's magic. If you are scared of button holes or need a refresher, my go to button hole tutorial can be found here by Prudent Baby, but now called Pretty Prudent.
17. EEK! Now stuff that bad boy with a pillow form or make your own and send me a picture ASAP! myfabricrelish {at} gmail {dot} com

Thanks so much!
Melissa @ my fabric relish

Oh, and I almost forgot...please be sure to vote for your favorite quilts for the Blogger's Quilt Festival at Amy's Creative Side! I am entered here (#33) and here (#5)!

Wednesday 11/6 Melissa from My Fabric Relish ME!
Friday 11/8 Kelly from My Quilt Infatuation
Thursday 11/14 Lindsey from Inspiring Creations
Wednesday 11/20 Jennie & Clara from Clover and Violet
Friday 11/22 Teje from Nero's Post and Patch
Monday 12/2 Tessa from The Sewing Chick
Wednesday 12/4 Bev from Flamingo Toes
Monday 12/9 Stacy from Freshly Handmade
Wednesday 12/11 Christa from Christa Quilts
Friday 12/13 Erin from Why Not Sew?
Linking up with all my friends on the right and Crazy Mom Quilts!
Lets get started!
1. Gather Supplies:
- Charm Pack - I used In from the Cold by Kate Spain for Moda
- 1 yard of white/grey/low volume (or you can mix and match)
You will need to cut 2 - 13 1/2 x 18 1/2 inch strips; 9 - 5x5 inch squares; and 1 - 13 1/2 in. square.
- scrap fabrics for wood trunk
- embroidery thread for embellishing
- 21 x 21 inch white muslin (backing for inside of pillow)
- 20 x 20 inch batting
- 1 button
And LOOK! It's reversible!
2. Print 3 copies of the tree template, which equals two pages per tree and six pages all together.
Christmas Tree Template 1 of 2
Christmas Tree Template 2 of 2
3. Tape the pattern together along the red line. Make sure your 1 inch test square is in fact 1 inch.

4. Choosing and cutting fabrics.
- Choose 5-6 of the charm squares and cut in half on the diagonal. These will be your trees.
- For the tree surrounding you will need 9, 5 inch squares. You can pick some low volume from your charm pack or from your yardage. I wanted these to look like falling snow. You will also cut each of these on the diagonal. Now you have a total of 18, 1/2 squares.
- Choose 6 charms from your pack for under the tree. I picked ones that I thought represented things you find under a Christmas tree. :)

5. Now it's time to piece! Yay! If you are new to foundation paper piecing (FPP), there are many tutorials on the web and videos on YouTube. If you are looking for a bit of guidance, check out my blog post here.
IMPORTANT TIP: Since the fabric triangles for the trees are exactly the right size needed, make sure you line up your fabrics along the line no more that 1/4 inch.


6. Now it's time to trim your blocks. Be sure to add a 1/4 seam allowance to each of the blocks (not included in the pattern). See picture below...


7. Once you have made all three, remove the paper, piece together and press seams open.
8. Add your 3 1/2 x 18 1/2 inch borders to the top and bottom and press.
9. Now it's time to make your quilt sandwich. When making pillows, I prefer to using muslin for the backing since no one will see it and it's much cheaper. You can now quilt as you wish. I went for wavy lines on the top and bottom borders to look like snow and then pebbles in between the trees to look like snow falling. I stitched in the ditch around the trees and trunk.
10. Embellish! Once you are happy with the quilting, you can embellish with some hand embroidery or even add beads to the tree to look like lights. I added stars above each of the trees and then "Believe" at the bottom (kind of hard to see when the pillow is sitting up...oh well). I used my disappearing ink marker, but just be sure to test it on your fabric first (which I NEVER do...shame on me!) and spell check your word, too. Oops! Don't worry, I fixed it! haha This will be a good time to trim down your top to 18 x 18 inches. You shouldn't need to trim the sides, just the top and bottom. You need to keep a 1/4 inch on the sides of the trees so you don't loose your points.


11. Making the back: Now set the top aside and it's time to start on the back. Take 16 of the remaining charms and make a 4x4 block. Make a 1/4 hem at the top of the block. If you would rather quilt this portion, you can add binding to just the top and omit the hemming part. I probably should have quilted this part as well, but I was a tad bit short on time.


12. Time to make the envelope lip! Take a 13 1/2 inch square piece of fabric and slice in 1/2 on the diagonal. Put right sides together and sew a 1/4 inch seam along the short, 90 degree sides of the triangle or the "L". Trim the corner, turn inside out, press, and topstitch the "L".


13. Now it's time to make the pillow sandwich! Lay front (trees) of pillow right side up, then envelope lip on the top with the tip pointed towards the bottom (pin a few times here so it doesn't shift), then lastly the back 4x4 block right side down with hem at the top. Pin the heck out of this layer and even use some Clover Wonder Clips if you have them.


14. Sew the pillow together: Sew a 1/4 inch seam around the pillow using a small stitch length (about 2.0) being sure you only catch the front and envelope layer on the top. Hope that makes sense? In other words, you do NOT sew the hemmed end of the back to the envelope and front OR you will stitch the whole thing together!

15. Getting close! Trim the corners on the inside and finish the exposed edges with either a serger or zigzag stitch. Or you can just leave it be. Totally up to you! Turn inside out and start getting excited!
16. Almost done! Time to add your button hole to the back of the pillow at the bottom of the envelope lip. I just took the fabric covered button I made and marked my button hole line and then let my machine work it's magic. If you are scared of button holes or need a refresher, my go to button hole tutorial can be found here by Prudent Baby, but now called Pretty Prudent.
17. EEK! Now stuff that bad boy with a pillow form or make your own and send me a picture ASAP! myfabricrelish {at} gmail {dot} com
Thanks so much!
Melissa @ my fabric relish
Oh, and I almost forgot...please be sure to vote for your favorite quilts for the Blogger's Quilt Festival at Amy's Creative Side! I am entered here (#33) and here (#5)!
Wednesday 11/6 Melissa from My Fabric Relish ME!
Friday 11/8 Kelly from My Quilt Infatuation
Thursday 11/14 Lindsey from Inspiring Creations
Wednesday 11/20 Jennie & Clara from Clover and Violet
Friday 11/22 Teje from Nero's Post and Patch
Monday 12/2 Tessa from The Sewing Chick
Wednesday 12/4 Bev from Flamingo Toes
Monday 12/9 Stacy from Freshly Handmade
Wednesday 12/11 Christa from Christa Quilts
Friday 12/13 Erin from Why Not Sew?
Linking up with all my friends on the right and Crazy Mom Quilts!


Love this!! Congrats on being featured! I adore your envelope backing and now I must go make one!
ReplyDeleteThanks so much...it was an honor for sure! I'm so happy I decided to do the envelope back. I almost added a "To:Santa" label. :) please share if you give it a whirl!!
DeleteLovely tutorial. I love the back on your pillow/cushion. Such a clever and decorative way to close it
ReplyDeleteThanks so much! There was a pillow at the hotel we stayed at last weekend and it had the same envelope closure; so, I knew I needed to do it for this pillow! Thanks so much for stopping by and leaving a sweet comment!
Deletea very good tutorial, I have not mastered paper piecing but maybe one day, think I need to actually see someone doing it. I feel I could make this without the paper if I did the trees using the flying goose method???
ReplyDeleteThanks Margaret! Yes, these are flying geese technically and you can just make three geese and then add the base easily. I'm terrible at piecing geese so I like the accuracy of paper piecing. Hope you give it a try and let me know if you do. :)
DeleteThat is so sweet. Thanks so much for the tutorial.
ReplyDeleteThanks so much and you are so very welcomed! It was fun to do! Thanks for visiting!!
DeleteThanks for the tutorial - very timely! I need to change up the pillows on my couch with some holiday coverings.
ReplyDeleteyou are so welcome! please share if you make some! thanks for visiting!
DeleteWhat an adorable pillow! I love the addition on embroidery to make it extra special. Great tutorial Melissa!!!
ReplyDeleteThanks Tessa Marie! I am glad you like it! Thanks so much for stopping to visit and leaving a thoughtful comment. Have a great weekend!
DeleteHow cute! I just love the hand stitching.
ReplyDeleteThanks Paula! Hope you have a great weekend!
Deletelove this pillow! The back is just as pretty as the front!
ReplyDeleteThank you so much for sharing at Needle and Thread Thursday!
:) Kelly @ My Quilt Infatuation
Thanks so much, Kelly! Thanks for letting me share at N&TT!
DeleteSuch a sweet little cushion! Love how you finished off the back!
ReplyDeleteWhat a cute Christmas pillow! Thanks for the awesome tutorial.
ReplyDeleteGreat tutorial and pictures! I love the "believe" you stitched on there. What a great touch.
ReplyDeleteSo cute and a great tutorial! Thanks so much for linking up :)
ReplyDeleteOutstanding article Flowers Embroidery Designs , thank you so much for sharing this article.
ReplyDeleteA very excellent blog post. I am thankful for your blog post. I have found a lot of approaches after visiting your post. tree removal Santa Maria
ReplyDeleteThis is a smart blog. I mean it. You have so much knowledge about this issue, and so much passion. You also know how to make people rally behind it, obviously from the responses. tree trimming
ReplyDeleteIt is a fantastic post – immense clear and easy to understand. I am also holding out for the sharks too that made me laugh
ReplyDeleteDigital asset exchange | cryptocurrency exchange | Best cryptocurrency exchange website
this website With such a huge amount of rivalry out there choosing the best tree specialist for you can be an overwhelming assignment. Tree Surgeon is certainly not an ensured term which lamentably implies that pretty much anybody with a saw can profess to be an expert arborist.
ReplyDeletemanufactured (empty fiber) or characteristic (quill or down), or maybe something more unordinary like adaptive padding, latex, cotton or water. discountmattressnova
ReplyDeleteAmazing that you share this informative blog, Really looking forward to read artical like this.
ReplyDeletedaikin ac 1.5 ton 3 star models
Utilizing prefinished wood flooring has the two benefits and impediments over incomplete materials that are set down and later wrapped up. India Manufacturing
ReplyDeleteAll residue should be taken out before each progression of the interaction, and care should be taken that the stain and the resulting hard covering substances are viable. Vietnam manufacturing
ReplyDeleteThe problem is that there is a wide variation in terms of quality, which means that customers have to take into consideration many vital factors before they can make the right decision as to which mattress is best for them. truck mattress
ReplyDelete